Introduction

Surface에 대해 배울 예정. 하드 코딩된 색상 배열 대신에 기존 Meterials의 색상으로 모델을 렌더링한 다음 alternative look으로 기차에 대한 Texture를 추가한다.
또한 성능 저하가 거의 없이 100개의 기차를 렌더링하는 방법과 성능에 대해 배운다.
Materials

Model I/O를 사용하여 Model을 읽는다. Index drawing을 위해 MDL mesh와 submesh를 MetalKit mesh와 submesh로 변환한다.
submesh는 material도 갖고 있다.
material 속성들은 mesh group의 surface를 보여준다.
각 모델 I/O submesh에는 material 관련 속성(base color, specular intensity, roughness, metallic, ambient, occlusion, bump .. etc)이 모여있는 material 객체가 있다.
기차는 6개의 submesh 그룹으로 나뉜다.
이러한 각 submesh에는 기본 색상이 다른 재질이 있다.
Model을 생성할 때, 단색Flat Color 대신에 Texture를 Group에 할당할 수 있다.
이 경우 MDLMaterial은 기본 색상을 색상에 대한 float3와 Texture 파일에 대한 문자열로 갖고 있다.
기존엔 Materials의 baseColor인 float3 값만을 사용하지만, 대신에 Texture를 파일을 사용할 수 있다.
이제 Model이 로드될 때 submesh material이 함께 로드되도록 Model 클래스를 변경한다.
Mesh.swift
import Foundation
import MetalKit

struct Mesh {
    let mtkMesh: MTKMesh
    let submeshes: [Submesh]

    init(mdlMesh: MDLMesh, mtkMesh: MTKMesh) {
        self.mtkMesh = mtkMesh
        submeshes = zip(mdlMesh.submeshes!, mtkMesh.submeshes).map {
            Submesh(mdlSubmesh: $0.0 as! MDLSubmesh, mtkSubmesh: $0.1)
        }
    }
}

struct Submesh {
    let mtkSubmesh: MTKSubmesh
    var material: Material

    init(mdlSubmesh: MDLSubmesh, mtkSubmesh: MTKSubmesh) {
        self.mtkSubmesh = mtkSubmesh
        material = Material(material: mdlSubmesh.material)
    }
}

private extension Material {
    init(material: MDLMaterial?) {
        self.init()
        if let baseColor = material?.property(with: .baseColor),
            baseColor.type == .float3 {
            self.baseColor = baseColor.float3Value
        }
        if let specular = material?.property(with: .specular),
           specular.type == .float3 {
            self.specularColor = specular.float3Value
        }
        if let shininess = material?.property(with: .specularExponent),
           shininess.type == .float {
            self.shininess = shininess.floatValue
        }
    }
}
UV Map

Texture로 기차를 Rendering해본다.
Model은 3D고 2D 이미지로 둘러싼다. Photoshop이나 Substance Painter 또는 Blender와 같은 특수 Texturing 앱에서 Texture 이미지를 만들 수 있다.
첫 번째 문제는 3D 기차의 일부를 2D 이미지의 일부와 매핑하는 방법이다.
Texture 이미지의 왼쪽 상단에 있는 어두운 부분은 굴뚝이고 이미지 오른쪽 하단의 빨간색 줄무늬는 차체 주변의 줄무늬이다.
기차와 텍스처 사이의 누락된 부분은 UV 맵이다.
UV Map을 사용하면 3D의 모든 정점이 2D의 점에 Mapping된다. 이들은 X Y 평면에 있지만 UV 좌표라고 한다. U는 수평이고 V는 수직이다.
여기에서 모든 기차가 2D로 잘려 배치된 것을 볼 수 있다.
굴뚝은 왼쪽 상단에 있고 본체 실린더는 오른쪽 하단에 있다. UV 맵에 맞도록 각 UV 그룹을 원하는 방식으로 회전할 수 있다. 그런 다음 이 UV 맵을 내보내고 Photoshop 또는 그림판과 같은 앱에서 그려준다.
Left : 파일에 나열된 일부 3D Vertex
Right : 각 Vertex가 2D UV 좌표에 Mapping되는 방식
UV 좌표는 0에서 1로 정규화된 좌표이다. 장점은 저해상도 프로그래머 아트를 만들고 나중에 고해상도 아티스트가 만든 텍스처로 교체할 수 있다는 점이다. 텍스처를 교체할 때 코드를 전혀 변경할 필요가 없다.
Texture Coordinates

Shader.metal
struct VertexOut {
    float4 position [[position]];
    float3 color;
    float3 worldNormal;
    float3 worldPosition;
    **float2 uv;**
};

struct VertexIn {
    float4 position [[attribute(0)]];
    float3 normal [[attribute(1)]];
    **float2 uv [[attribute(2)]];**
};

vertex VertexOut vertex_main(VertexIn vertexBuffer [[stage_in]],
                             constant Uniforms &uniforms [[buffer(21)]]) {
    VertexOut out {
        .position = uniforms.projectionMatrix * uniforms.viewMatrix * uniforms.modelMatrix * vertexBuffer.position,
        .worldNormal = (uniforms.modelMatrix * float4(vertexBuffer.normal, 0)).xyz,
        .worldPosition = (uniforms.modelMatrix * vertexBuffer.position).xyz
        .worldPosition = (uniforms.modelMatrix * vertexBuffer.position).xyz,
        **.uv = vertexBuffer.uv**
    };
    return out;
}
Textures

Color Texture로 기차를 Rendering한다.
submesh material을 읽을 때 Texture를 load하고 GPU가 Texuture에서 sampling할 수 있도록 기차를 Rendering할 때 fragments function에 Texutre를 보낸다.
Texture의 Pixel은 Texel이라고 한다. Texel은 항상 fragment들과 일대일로 match되진 않는다.
Fragment Fucntion에서 설정한 Sampler 객체를 사용하여, GPU에게 Texel을 읽는 방법을 정확하게 설명한다.
예를 들어 Texutre가 Rendering하는 영역에 비해 너무 작으면 늘어난다. 이 필터링 모드를 Linear 또는 Nearest로 설정할 수 있다.
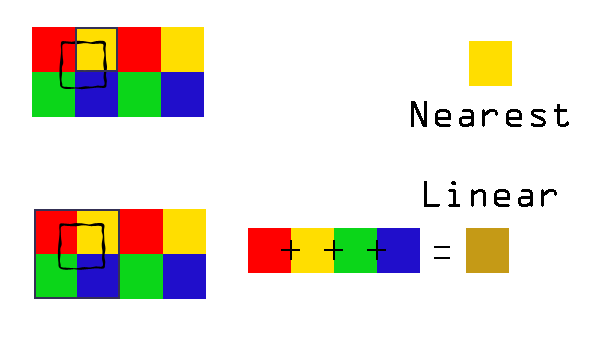
Nearest : 가장 가까운 픽셀을 읽고 픽셀화. Retro 느낌을 줄 수 있다.
Linear : 인접한 픽셀을 평균화하여 매끄러운 모양을 제공하지만 너무 많이 늘리면 흐릿해진다.
Texture를 바둑판 식으로 배치Tileing하고 싶을 때가 있다.
예를 들어 넓은 지형이 있는 경우 지형 전체에서 반복되는 작은 풀 Texture가 있을 수 있다.
Repeat Address Mode를 사용하여 GPU에 이 작업을 수행하도록 지시할 수 있다.
Texture를 고정한 채로 가장자리 픽셀을 Texture로 반복하거나(clamp_to_edge), 일반 검정색을 사용할 수 있는(clamp_to_zero) 다른 Address Mode가 있다.
submesh class에 Texture Loading을 추가하고 Model을 Rendering할 때 Model의 Color Texture를 Fragment function으로 보낸다.
Mesh.swift
struct Submesh {
    ...

    struct Textures {
        let baseColor: MTLTexture?

        init(material: MDLMaterial?) {
            guard let baseColor = material?.property(with: .baseColor),
                  baseColor.type == .texture,
                  let mdlTexture = baseColor.textureSamplerValue?.texture else {
                self.baseColor = nil
                return
            }
            let textureLoader = MTKTextureLoader(device: Renderer.device)
            let textureLoaderOptions: [MTKTextureLoader.Option:Any] = [
                .origin: MTKTextureLoader.Origin.bottomLeft
            ]
            self.baseColor = try? textureLoader.newTexture(texture: mdlTexture,
                                                           options: textureLoaderOptions)
        }
    }

    ...
}
Shader.metal
        const sampler s(filter::linear);
float3 baseColor = baseColorTexture.sample(s, in.uv).rgb;'IT > Graphics' 카테고리의 다른 글
| Metal 스터디 7주차 (23.01.26) (0) | 2023.02.11 |
|---|---|
| Metal 스터디 6주차 (23.01.19) (0) | 2023.02.06 |
| Metal 스터디 4주차 (23.01.06) (0) | 2023.01.15 |
| Metal 스터디 3주차 (22.12.22) (0) | 2022.12.28 |
| Metal 스터디 2주차 (22.12.15) (0) | 2022.12.28 |


댓글